Wednesday, December 7, 2011

THE END!


It's been so long but the journey is finally over. The cabinet was built and delivered much to the satisfaction of the group and of the clients. It was a hectic ride but we're so glad that we were able to do something really wonderful for someone else. Hope you enjoyed these last photos and thanks for following along until the end. We really appreciate it.

Cheers, WAM Group

Monday, November 21, 2011

THE RAISING OF THE CABINET.

Today was extremely exciting because it was time to raise the cabinet. When we put the two pieces together and stood it up for the first time we were all so proud of all the work we had accomplished. It finally came together and was an actual, standing, very tall cabinet.

Here are some photos of us, celebrating this victory:


Thursday, November 17, 2011

SO CLOSE!

We've accomplished SO much in the wood shop this past week leading up to Thanksgiving Break. The build crew has made significant progress, while the rest of the group has continued on with tying up the other ends of the project and maintaining communication with the WAM staff.

Here are some awesome photos of the progress we've made. So close to being done!


Monday, November 14, 2011

CONTRUCTION, DESTRUCTION.

As construction continues, we've run into some delays along the way, mostly with cutting and making sure each piece fits where and exactly how it is supposed to. We've learned a lot about the overall inner-workings of the wood shop but it does get a little frustrating when things don't go right the first time you do them. But learning....that's the point of the project, right?

Hopefully we can remain positive until the finish, even when things go a little awry every once in a while.


BUDGET.

A HUGE part of this project has been the budget and how we responded to the amount that was given to us. We had to tweak materials, taking every knob and side into account to make sure our deliverable was within the amount afforded to us.

Here is the budget as it currently stands:

Sunday, November 13, 2011

CHRISTMAS IN NOVEMBER.

Today, our spirits were lifted when we received a few shipments of materials for our cabinet. The metal siding and wheels came in and opening the boxes was like a little mini-Christmas, in November.

It just reiterates that this cabinet is very real and that people are counting on us to make it happen.

Here's photos of our mini-Christmas!


Wednesday, November 9, 2011

GETTING THE BALL ROLLING.

We've been working very hard in the shop, trying to get the joinery cut so that we can begin assembly.

Here are some photos of some group members working in the shop:


Tuesday, November 8, 2011

SCHEDULING DELAYS.

We have been in the construction phase for about two weeks now and one of the most frustrating, and proving to be the most challenging, things about our project is coordinating with outside parties to help us get this cabinet built.

Our group has some experience with the wood shop, yet we've needed the help of others to point us in the right direction and guide us to the best way to go about things.

Actually getting into the wood shop AND having someone there to help are proving to be more of a challenge than we ever imagined.

I thought this photo perfectly captured the emotions that we have been feeling these two weeks, exasperated and a little burnt out.


CONSTRUCTION BEGINS!

Finally, after what seemed like ages, construction has began on the final cabinet.

A few of our group members went to the CAM studio, where they used the laser cutter to cut the top curve and cut outs for the cabinet, simply to make sure that they were extremely precise.

Here is the cut wood, waiting to have the joints cut and assembled!

Monday, November 7, 2011

CONCLUSIONS ABOUT THE DOORS.

After much contemplation and wishing to remain true to our concept, we met with Nancy and Kate again with two ideas to fix the problem of that they had with the doors.

Here are the two options that we presented them with.

[1] Having symmetrical doors, equal in width so that when folded back they will allow the cabinet to sit flush with the wall. This cut will be straight down the center of the doors but will still have the curved cut out to open and close the cabinet with.

[2] Having the larger door be cut into two pieces, similar to the sketch from Patrick below. The door will open, fold back, then have a separate piece that folds again to make the door flush with the back of the cabinet. This option would require that we install another piano hinge on the second cut in the larger door.

In the end, they decided that option one was the most appropriate choice for the cabinet and we may now proceed with building and construction!

LAST MINUTE DEISGN CHANGES.

After mulling over our presentation, Weatherspoon Director, Nancy Doll had some concerns that she shared with us about the doors to the cabinet. She was worried that when the large door opened all the way, and is flush with the side of the cabinet, that it inhibits the cabinet from being able to be flush with the wall.

This type of thing is expected in the design process, changes must be made to accommodate the needs and wishes of the clients.

Here is a quick sketch our professor sent us after speaking with Mrs. Doll about her concerns with a possible solution to this issue, doors that fold twice so that it allows the cabinet to sit flush with the wall.

Sunday, November 6, 2011

RESPONSES TO THE PRESENTATION.

During our meeting with the WAM staff, and an initial presentation of our ideas for the cabinet, we received direct feedback during the meeting itself. Surprisingly, the one thing they did not approve of was the Weatherspoon Green, an element that we as a group were not fond of in the first place. They were very impressed with all of the hard work that we have put into this and enthusiastic about seeing the finished product.

It was a nice day to get revved up about the final stages of the project, a gentle reminder of who we are doing this for, and what it means to them.

Here is a photo of us with the Weatherspoon staff, our project board, and model:

Saturday, November 5, 2011

MODEL.

Along with the board that we presented to the Weatherspoon Art Museum, we also built a scale model at a fourth of the size of the actual cabinet. It was a long, grueling process but taught us a lot about the actual building process of the cabinet. We were so pleased, and surprised, with how well the model came out.

It was also a very important tool in our presentation because it allowed Nancy and Kate, our clients, to have a tangible model of the cabinet, that they could pick up, look at, and interact with.

Here are some photos of the model that we built:


PHASE TWO DESIGN.

After presenting everyone with our initial revision of the design, we were off to yet again gather up all of the suggestions we received and come up with an even greater improvement to the cabinet.

We also had an approaching meeting with the staff of the Weatherspoon Art Museum, so it was important that we get our ideas down and really finalize the design as a whole.

Here is a photo of the board that we presented to the WAM staff:


 The changes in the cut outs of the door are very clear on this rendering. We believed that continuing the shape of the curve throughout the cabinet would really create a cohesive look throughout. We also changed the design of the shelves in the door, with the tops of them also mirroring the curve of the cabinet top.

We were all so pleased with the design, it has come so far since day one when we recieved the original sketch by Frank Cheney. It's nice to compare the two, so here's a reminder photo of day one:


Thursday, November 3, 2011

WOOD AND FIELDTRIPS.

We recently went on a group excursion to pick out the birch wood that we had decided upon for the main building material of the cabinet.

For this, we all piled in the car and drove to Madison, NC to the Steve Wall Lumber Company. Once we got there, it was a pretty straightforward trip but was important because we all got to see and touch the wood in actuality instead of looking at photographs of birch wood online.

They have a HUGE selection there, so if you are ever in the market for lumber, you should try it out.

Here is a photo of birch wood, the material chosen to echo the materials already present in the shop and the main material for the cabinet.

Tuesday, November 1, 2011

SPEAK NOW, TELL US WHERE YOU ARE.

One day in class, we were assigned an impromptu speech, to help educate the class on where we were in our individual projects for studio. We had 3-4 minutes to talk and had to produce a visual aide for the class, which we did in the form of a powerpoint.

We basically updated them on where we were design wise, with our nearly finished design including asymmetrical doors, materials, and hardware. A large part of the speech, however, was explaining to the class why we made the design decisions that we did.

This was helpful by not only allowing us to explain it to an audience but forced us to really put a reason behind the rhyme in our case.

Here is a photo of Sarah's outline for the speech from her sketchbook.

Monday, October 31, 2011

PHASE ONE DESIGN.

After much deliberation on the elements discussed in the previous post, we finally nailed down what we believe to be a great contender for what the final cabinet will look like.

During a very unsuspecting conversation with Patrick, our studio teacher, and a little messy sketch, the idea of having asymmetrical doors was born into our design process.

Other things we nailed down during this deliberation:

[1] Acrylic shelving for the interior and top materials, to allow light to cascade down through the cabinet as a whole and illuminate the merchandise that will be stored there.

[2] Celebration of the hardware, we came to the conclusion of having the hardware exposed and incorporated into the design rather than trying to conceal it.

[3] Hardware material, after discussion and review of the budget, we decided that brushed nickel would be the most cost effective material to use for the hardware of the entire cabinet.

[4] Cut outs, instead of using hardware for the door handles and drawer pull, we decided on having cut outs that would be the same shape as the curve for the top. This would create unity and visual appeal and can be seen in the sketch up below.

Here is a rough, computer generated sketch up of what we are envisioning for the cabinets final appearance:

Saturday, October 29, 2011

PHASE ONE.

After deliberating with Kate and pinpointing exactly what she wanted for the concept of the cabinet, we began to brainstorm about exactly how to shape our design and bring it to life.

The ideas we had nailed down were mostly about shape and materiality:

[1] We decided to use Frank's concept for the original design.
[2] We knew that we were going to incorporate birch and acrylic to help echo the influences found in the shop.
[3] At Kate's request, the Weatherspoon Green would be included in the detail work of the cabinet.

Things we speculated about:
[1] Joinery and how exactly we were going to put the entire cabinet together so that it would be stable and safe
[2] 
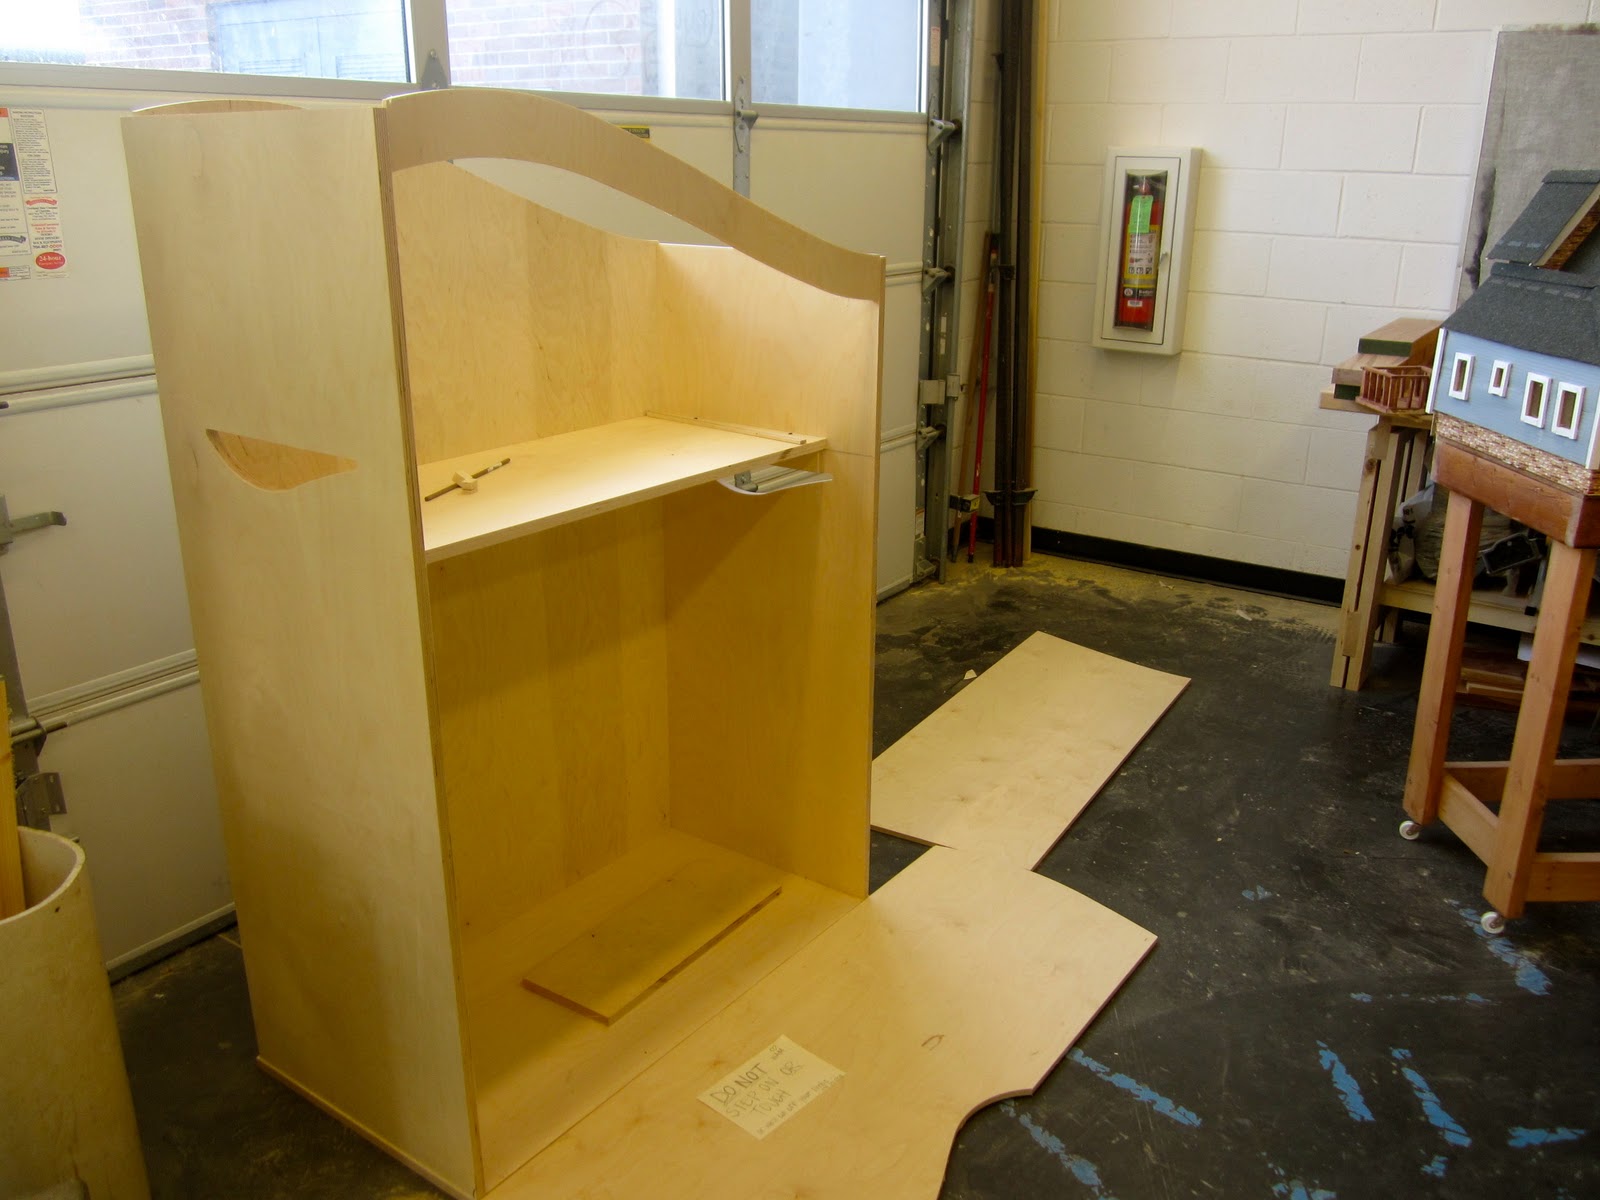
Top material, we still did not know exactly the form and material of the top of the cabinet. Below are some photos of our original, phase one sketch models and drawings.
[3] Hardware, at this point, whether or not the hardware would be celebrated as a design element or not was still in the process of formation. Also, what material of hardware we would use. Brushed nickel, aluminum, and stainless steel all made appearances in the conversations of this phase.
[4] 
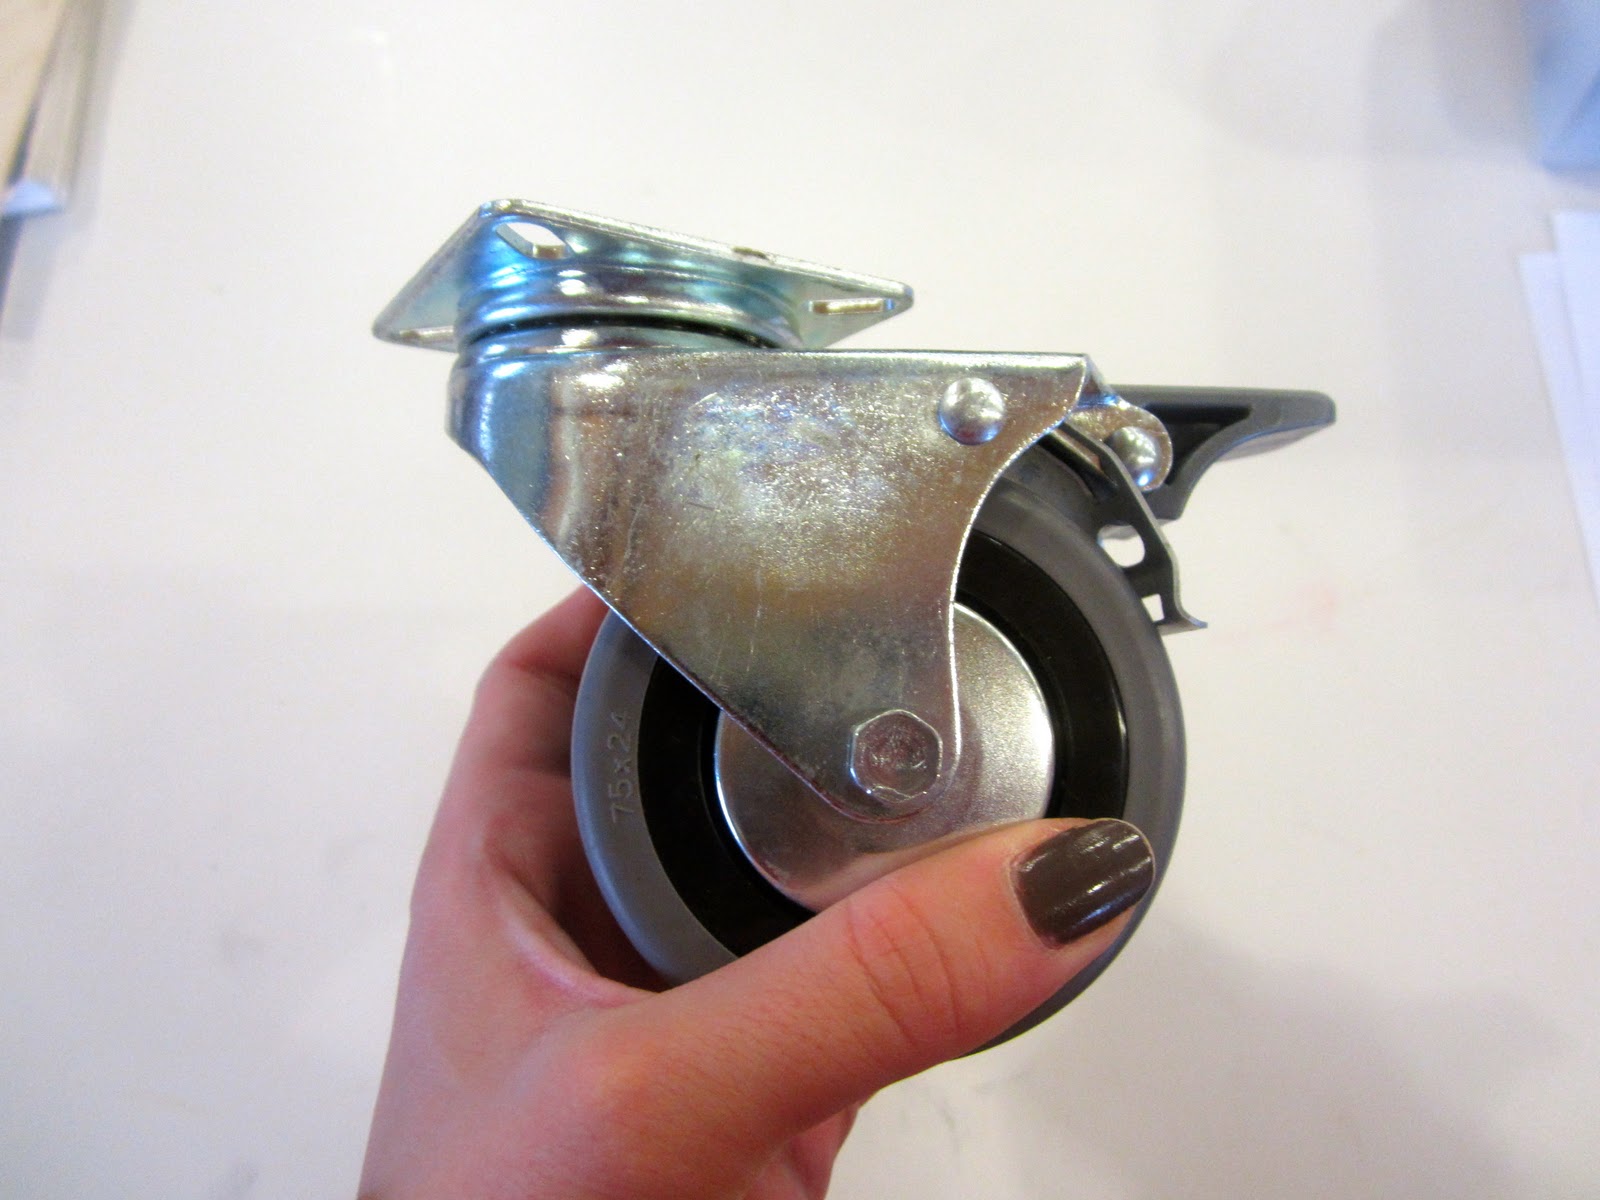
Wheels, we discussed different types of wheels, taking into consideration the weight distribution and stability of different types of wheels. We are even looking into exploring wheels that will allow the cabinet to be dropped, to be flush with the floor when immobile. Locking wheels are also a definite for safety.

Here are some of the original idea sketches.


Wednesday, October 26, 2011

ORIGINAL IDEA SKETCHES.

Here are a few pages from some of our group members sketchbooks, just jotting down ideas and trying to get a better understanding of the cabinet and how it will function. We also did sketches to understand how it will move, possibilities for materials and how light will play into the design.


CHATS WITH KATE.

One of the main components of our project is serving the need of our clients, the staff of the Weatherspoon Art Museum. To do this, we had to establish and maintain a relationship with a few of the Weatherspoon's key players, Nancy Doll, the director of the museum and the gift shop manager, Kate.

Here is a list of things that she originally requested:

[1] Materials. That would echo the feel of the shop itself, using similar materials to those that existed in the shops shelving units such as birch and frosted plexiglass.

[2] Safety. It was extremely important that this cabinet be user friendly and safe. She stressed that the shelves be high enough from the group that, "children could not hang on them."

[3] Sturdy. Kate was initially concerned about the heaviness of the cabinet, especially after the merchandise had been added. She requested we spend special time securing the cabinet so that it runs no risk of tipping over during motion.

[4] Clear Shelving. The merchandise in the gift shop is very special to Kate and to the museum staff and they want to share it with all Weatherspoon's visitors. She wanted to have clear shelving on the doors so that the merchandise placed on them will be visible through the shelving walls.

[5] Weatherspoon Green. The color we all love.... It is the Weatherspoon's theme color, featured on various signs and pamphlets throughout the museum. She requested that this color be included somewhere on the cabinet, to define it's identity and relationship to the museum.

Tuesday, October 25, 2011

LIGHT STUDIES.

One of the most important elements of this project, to us as a group, was the light. In this stage, we were still debating on exactly where the lighting for the cabinet would come from, whether it would be natural or artificial, etc.

We compiled some light studies to better understand exactly how lighting would affect the impact of the cabinet and you can view some of those studies below: